As a passionate firearms enthusiast and seasoned content writer with over a decade in the industry, I’ve witnessed firsthand the remarkable evolution of the rifle, not just as a tool, but as a customizable and personal extension of its owner. From the traditional bolt-action hunter’s companion to the modular modern sporting rifle, each firearm is a symphony of precisely engineered components. Understanding these parts is not merely about mechanical prowess; it’s about safety, performance, and the sheer satisfaction of mastering your equipment.
The American firearms landscape is vast and vibrant. According to recent data, approximately 82.88 million people owned at least one firearm in the US in 2023, with over 40% of US households possessing a firearm. This robust community of owners fuels a significant market, with the global guns and accessories market valued at USD 7.12 billion in 2024, and North America holding a commanding 34.27% share. Within this, the "accessories" segment, which includes crucial kits and parts, is anticipated to witness significant growth, as firearm owners frequently replace items like barrels, magazines, and other components. This highlights a clear trend: responsible firearm ownership often involves maintenance and, yes, parts replacement.
This comprehensive guide is designed for the discerning US rifle enthusiast. Whether you're a seasoned shooter or just beginning your journey, knowing how to identify and replace common rifle parts is an invaluable skill that enhances your understanding, improves your rifle's longevity, and most importantly, reinforces safe handling practices.
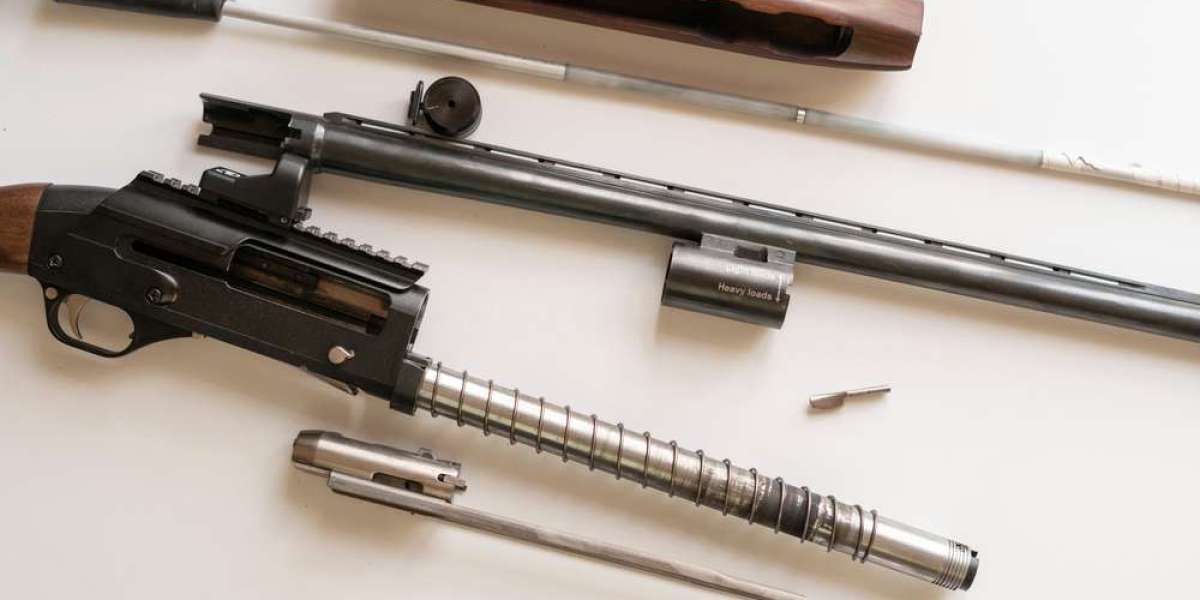
The Anatomy of a Rifle: Identifying Key Components
Before we delve into replacement, a solid understanding of each part’s function is essential. Rifles, regardless of their specific type, share fundamental components. Let’s break them down:
1. The Action: The Heartbeat of Your Rifle
The action is arguably the most critical part of any rifle, housing the firing mechanism and facilitating the loading, firing, and extraction of cartridges.
Receiver: The main body of the action, often the serialized component (the "firearm" by legal definition). It houses the bolt, trigger group, and magazine well.
Bolt/Bolt Carrier Group (BCG):
Bolt Action: The bolt directly manipulates cartridges, locking into the receiver during firing. Key components include the bolt body, firing pin, extractor, and ejector.
Semi-Automatic (e.g., AR-15): The Bolt Carrier Group (BCG) is a complex assembly that cycles rounds, containing the bolt, bolt carrier, firing pin, cam pin, and firing pin retaining pin.
Trigger Group: Consists of the trigger, hammer (or striker), sear, disconnector, and springs. This is what initiates the firing sequence.
Magazine Well (for detachable magazines): The opening where the magazine is inserted.
Ejection Port: The opening through which spent casings are ejected.
Common Wear Points (Action): Firing pins, extractors, ejectors, and springs within the trigger group are prone to wear due to repeated impact and friction. On semi-automatics, gas rings on the bolt can also degrade.
2. The Barrel: Guiding the Projectile
The barrel is where the magic of ballistics truly happens, guiding the bullet and imparting spin for accuracy.
Bore: The interior of the barrel.
Rifling: The helical grooves inside the bore that spin the bullet.
Chamber: The rearmost part of the bore, precisely shaped to hold the cartridge.
Muzzle: The end of the barrel where the bullet exits.
Gas Block/Gas Tube (for gas-operated semi-automatics): Channels propellant gases back to cycle the action.
Common Wear Points (Barrel): The throat (where the bullet enters the rifling) and the crown (the very end of the muzzle) are susceptible to wear and erosion, impacting accuracy. Gas tubes can also corrode or become fouled.
3. The Stock & Furniture: Ergonomics and Control
The stock and associated furniture provide the shooter with a stable platform and points of contact for control.
Buttstock: Rests against the shooter’s shoulder. Can be fixed, adjustable, or folding.
Forend/Handguard: The forward part of the stock, providing a gripping surface and often mounting points for accessories.
Pistol Grip (on some rifles): Ergonomic grip for the shooting hand.
Buffer Tube/Receiver Extension (on AR-15s): Houses the buffer and recoil spring assembly.
Common Wear Points (Stock & Furniture): While generally durable, stocks can crack, especially at stress points like the tang or recoil lug areas. Forends can become loose, and pistol grips can wear down or be upgraded for better ergonomics. Buffer springs in AR-style rifles will fatigue over time.
4. Sights and Optics: Aiming True
Precision shooting relies heavily on your aiming system.
Iron Sights: Fixed or adjustable front and rear sights.
Optics (Scopes, Red Dots, Holographic Sights): Mounted on the receiver or handguard, these enhance aiming precision.
Common Wear Points (Sights/Optics): While less about "wear" and more about damage, mounting hardware can loosen, and optics can lose zero or suffer internal damage from impact.
5. Magazines: Fueling the Fire
Magazines reliably feed cartridges into the chamber.
Magazine Body: Holds the cartridges.
Follower: Pushes cartridges upwards.
Spring: Provides tension to the follower.
Baseplate: Secures the bottom of the magazine.
Common Wear Points (Magazines): Springs can weaken, followers can tilt or wear, and feed lips can bend or crack, leading to feeding issues.
The Repair Bench: A Step-by-Step Replacement Guide
Now that you can identify the parts, let’s talk about replacing the most common wear items. Remember, safety is paramount. Always ensure your rifle is unloaded and cleared before beginning any work.
Step 1: Gather Your Tools and Workspace
Having the right tools is half the battle. For most common rifle maintenance and part replacements, you’ll need:
Bench Vise with Non-Marring Jaws: Essential for securing the rifle without damage.
Armorer's Wrench (for AR-15s): Crucial for castle nuts, barrel nuts, and muzzle devices.
Punch Set (Roll Pin & Solid): For driving out pins.
Hammer (Brass or Rubber Mallet): For use with punches.
Screwdriver Set (with proper bits): Avoid stripping screws!
Torque Wrench: Critical for ensuring proper fastener tension, especially on optics mounts and barrel nuts.
Gunsmithing Mat: Protects your workspace and prevents small parts from rolling away.
Cleaning Supplies: To clean components before reassembly.
Appropriate Lubricants and Greases: Refer to your rifle’s manual.
Manufacturer’s Manual/Diagrams: Invaluable for specific torque specs and disassembly instructions.
Step 2: Unload and Verify Safe Condition
This cannot be stressed enough. Visually and physically inspect your rifle to ensure it is completely unloaded. Remove the magazine, clear the chamber, and lock the action open if possible. Double-check. Triple-check.
Step 3: Identify the Specific Part and Source a Replacement
Once you've diagnosed the issue, identify the exact part number or specification needed. Always prioritize genuine manufacturer parts or high-quality aftermarket equivalents from reputable vendors. The accessories segment of the global firearms market, which includes "kits and parts," is projected to grow significantly, indicating a healthy supply chain for most common components.
Step 4: Disassembly (Refer to Your Manual!)
This is where your rifle's manual becomes your best friend. Each rifle has its unique disassembly sequence. Generally, you’ll start by field stripping the rifle, then proceed to further breakdown as required for the specific part.
Example: Replacing an AR-15 Bolt Extractor:
Separate upper and lower receivers.
Remove the Bolt Carrier Group (BCG) from the upper.
Carefully remove the firing pin retaining pin, then the firing pin.
Drift out the extractor pin, being mindful of the spring and insert underneath.
Remove the old extractor, spring, and insert.
Step 5: Clean and Inspect Surrounding Components
Before installing the new part, take the opportunity to thoroughly clean the area. Inspect adjacent components for any signs of excessive wear, corrosion, or damage that might indicate a larger underlying issue. This proactive approach saves you headaches down the line.
Step 6: Installation of the New Part
Reverse the disassembly process, paying close attention to orientation and proper seating of all components.
Example: Installing an AR-15 Bolt Extractor:
Place the new spring and insert (if applicable, a black insert for heavier springs is common) into the new extractor.
Align the extractor with its channel on the bolt.
Carefully push the extractor pin back through, ensuring it captures the extractor and its spring assembly.
Reinstall the firing pin and its retaining pin.
Function test the bolt by hand to ensure the extractor moves freely.
Step 7: Reassembly and Function Check
Reassemble your rifle according to the manufacturer’s instructions. Once fully assembled, perform a thorough function check to ensure all safeties work, the trigger resets, and the action cycles smoothly. This is a critical safety step that verifies your work.
Step 8: Test Firing (in a Safe Environment)
If the part directly impacts firing or safety, a test firing at a safe, designated range is highly recommended. Start with a few rounds, observing the rifle’s behavior. Listen for unusual sounds, watch for proper cycling, and check spent casings for any anomalies.
Maintaining Your Investment: Beyond Replacement
Regular maintenance is key to extending the life of your rifle and minimizing the need for premature parts replacement. While individual preferences vary, a common guideline suggests cleaning your rifle after every range session, especially for those in regular use. For firearms carried frequently but not shot often, a field-strip and thorough cleaning every 30 days is recommended to remove lint, dust, and sweat. Even stored firearms should be periodically checked and wiped down to prevent rust.
The National Shooting Sports Foundation (NSSF) consistently advocates for responsible firearm ownership, and their statistics underscore the importance of safety. Unintentional firearm-related fatalities have declined dramatically, down 47% in the last two decades (1998-2018). This positive trend is attributed in part to educational efforts and industry initiatives, including providing free firearm locking devices with new firearms. Proper maintenance, including knowing your parts, contributes significantly to this safety culture.
Conclusion
Understanding the intricate mechanics of your rifle, from identifying its common parts to confidently replacing them, transforms you from a mere operator into a true enthusiast. It’s an empowering journey that fosters self-reliance, enhances your shooting experience, and reinforces your commitment to safe and responsible firearm ownership. Embrace the mystery, unravel its components, and enjoy the satisfaction of a well-maintained and perfectly functioning rifle.
Frequently Asked Questions (FAQs)
Q1: How do I know if a rifle part needs to be replaced versus just cleaned? A1: Look for signs of significant wear (e.g., rounded edges on pins, cracks in springs, excessive play), corrosion that cleaning can't remove, or if the part is causing malfunctions that can't be resolved by cleaning and lubrication. Refer to your rifle's manual for recommended inspection intervals or part life expectancies.
Q2: Can I replace rifle parts without specialized gunsmithing tools? A2: For simple field-stripping and cleaning, basic tools suffice. However, for many internal parts replacements, specialized tools like punches, armorer's wrenches, and torque wrenches are highly recommended to prevent damage to your firearm and ensure proper function. Investing in quality tools pays off in the long run.
Q3: Is it always better to use OEM (Original Equipment Manufacturer) parts? A3: Generally, OEM parts are a safe bet as they are designed to factory specifications. However, the aftermarket is robust, especially for popular platforms like the AR-15, offering many high-quality, and sometimes improved, alternatives. Research reputable brands and read reviews before purchasing aftermarket parts.
Q4: How often should I perform a full disassembly and inspection of my rifle? A4: This depends heavily on usage. For frequently used rifles, a full disassembly and inspection every 1,000-2,000 rounds, or annually, is a good practice. For rifles used less often, an annual check is usually sufficient. Always clean and inspect after any particularly harsh or dirty shooting sessions.
Q5: What are the biggest safety considerations when replacing rifle parts? A5: The absolute paramount rule is to always ensure the firearm is unloaded and cleared before beginning any work. Wear appropriate eye protection. Work in a well-lit, organized area. If you are unsure about any step, stop and consult a qualified gunsmith. Never force parts; if something doesn't fit, re-evaluate the process.